Hello, friend! Welcome here. Before we begin, I want to ask you a question that might make your heart skip a beat: Are you still struggling with calculating the "pip value" for different currency pairs, especially cross pairs like gold or the Japanese yen? If your answer is "yes," then congratulations—you've come to the right place. Forget those complicated formulas and maddening calculations. Today, I'll show you a more direct, simpler, and safer way to precisely manage the risk of every future trade.
I dare say this article could completely transform how you think about trading risk. My name is Qaolase, and I'm the site administrator here. Like you, I'm just an ordinary trader who's been rolling around in the markets for years. I know firsthand that 90% of new traders ultimately fail not because they misjudge market direction, but because they make critical mistakes in the most fundamental—and deadliest—aspect: position sizing. They either trade on gut feelings or rely on complex formulas they barely understand, often suffering devastating losses from minor market fluctuations. I understand this feeling because I've been there myself.
Thus, this article stems from a deep-seated desire within me: I wish for an ultimate guide that not only tells you "what" to do but also clearly explains ‘why' and "how." It will teach you a revolutionary, simpler method and provide a completely free tool that allows you to precisely set positions for any trading instrument—forex, gold, crude oil, even stock indices—like a professional in just 10 seconds. Together, let's transform trading from a nerve-wracking gamble back into a controllable, rigorous skill.
Risk Warning and Disclaimer
Before we dive in, please allow me to emphasize: This content is for educational and reference purposes only and does not constitute any form of investment advice. Trading foreign exchange and Contracts for Difference (CFDs) involves high risk, and losses may exceed your initial investment. Before making any investment decisions, ensure you fully understand all associated risks and seek professional advice from an independent financial advisor if necessary. All calculator tools provided on this site are designed to assist your trading planning. Their results do not guarantee future performance. Invest rationally and take responsibility for your financial decisions.
1. Why is "Position Sizing" the Holy Grail of Trading?
You've likely heard countless tales about the trading "Holy Grail"—some magical indicator, some foolproof strategy. But in my view, if a true "Holy Grail" exists in the trading world, it's neither a crystal ball predicting markets nor some complex algorithm. It's an extremely simple principle, yet one overlooked by most: sound position sizing management. This may not sound thrilling, but trust me—it's your sole hope for long-term survival in the markets. It's not about how you predict the market, but how you gracefully endure when your predictions prove wrong, preserving enough ammunition for the next battle.
At the core of this philosophy lies the "2% Rule," revered by countless professional traders as a guiding principle. This rule, popularized by legendary trader Alexander Elder in his book Trading for a Living, is brutally simple: Never risk more than 2% of your total account equity on any single trade. This means that if you have a $10,000 account, the maximum "tuition fee" you're willing to pay for any single trade is $200. No matter how confident you feel about a trade, no matter how tempting the market looks, this limit must never be exceeded. Why? Because it ensures that even if you suffer five or even ten consecutive losses (which is quite common in real trading), your account will only experience a controlled drawdown, not a catastrophic blow. You'll retain sufficient capital and confidence to wait for the next high-probability opportunity.
Think of it as your seatbelt in a race car or the oxygen tank on your back while diving. They don't guarantee you'll win the race or find treasure, but they ensure you won't lose your life in an accident. Position sizing is your trading account's "seatbelt." It liberates you from emotional slavery, replacing the internal battle between fear and greed during market volatility with a calm sense of "everything is under control." When you clearly understand that the worst-case scenario for this trade is only a 1.5% loss of your account, you can truly focus on executing your trading strategy instead of frantically watching the profit/loss numbers with a racing heart. This is the transformation from gambler to professional trader.
2: The Trap of the "Traditional Approach": Understanding Complex Pip Value Calculations
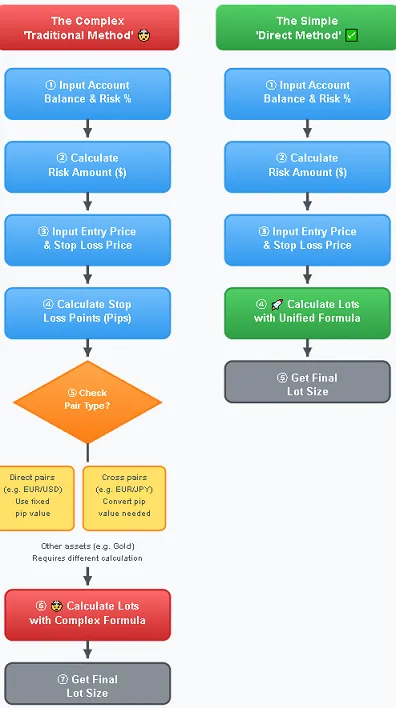
Alright, since we all agree that position sizing is crucial, the question arises: How exactly do you calculate the lot size that adheres to the "2% rule"? Here, we must first examine the "traditional method" taught in most tutorials and books today. I must be honest—logically, this method is completely sound, but for beginners, it's like a maze filled with traps, extremely unfriendly.
2-1: The 4 Steps of the Traditional Method
This traditional process typically involves the following four steps. Let's break it down step by step:
1. Determine Your Risk Amount: This step is straightforward. Simply multiply your total account equity by the percentage of risk you're willing to take.
Risk Amount = Total Account Equity × Risk Percentage
Example: For a $10,000 account risking 2%, the risk amount is $200.
2. Determine your Stop Loss in Pips: This step requires technical analysis. For instance, if you plan to buy EUR/USD at 1.0800 and set your stop loss below the support level at 1.0750, your stop loss is 50 pips.
3. [Challenge] Calculate the Pip Value for the Pair: This is the most frustrating step in the entire process. Pip value refers to the monetary value represented by a single pip movement. This value is not fixed; it varies based on the currency pair you're trading, your account's base currency, and the current exchange rate.
For Direct Pairs Quoted in USD (e.g., EUR/USD, GBP/USD): The pip value is typically fixed, e.g., $10 per pip for a standard lot (100,000 units).
For direct pairs with USD as the base currency (e.g., USD/CHF, USD/CAD): The pip value fluctuates with the exchange rate and is calculated as (pip value / exchange rate) × lot size.
For cross pairs (e.g., EUR/GBP, AUD/NZD): Calculations become more complex, requiring (one pip × the exchange rate of the base currency against USD) × lot size.
For yen cross pairs (e.g., EUR/JPY, GBP/JPY): The definition and calculation of pips differ entirely.
Feeling overwhelmed yet? It doesn't end there. If you're trading gold (XAU/USD) or crude oil (WTI), their "pips" or "ticks" represent value according to yet another set of rules.
4. Final Calculation: Lot Size
After painstakingly calculating the pip value, you can finally proceed to the final step.
Lot Size = Risk Amount / (Stop Loss Points × Point Value per Lot)
2-2: My Painful Personal Experience
I'll never forget my early days of trading. Once, I spotted a prime GBP/JPY (British Pound/Japanese Yen) opportunity. Out of habit, I applied the point value I knew from EUR/USD (1 standard lot = $10) to estimate my position size. I planned a 50-pip stop loss with a risk amount of $200, so I simply calculated: 200 / (50 * 10) = 0.4 lots. However, I completely overlooked that the pip value for yen pairs is significantly higher than dollar pairs! At the time, one pip in GBP/JPY was worth approximately $13. Consequently, when the price moved unfavorably by 50 pips and hit my stop-loss, my actual loss was 50 * 13 * 0.4 = $260—far exceeding my planned $200. Though only an extra $60, for someone with limited capital like me at the time, this sense of "loss of control" and the frustration over my ignorance and carelessness nearly shattered my trading confidence. That moment made me keenly aware of how this seemingly rigorous "traditional method" could lead to catastrophic consequences in practice due to a single oversight.
3. The Revolution of the "Direct Approach": A Simpler Position Sizing Mindset
It was precisely because of that painful experience, and witnessing countless newcomers repeatedly struggle with this issue afterward, that I began to wonder: There must be a simpler way! We trade "price"—why must we go through such a roundabout process, wrestling with that unpredictable "point value"? Thus, the "Direct Approach" thinking model was born. Its core principle is to completely abandon the concepts of ‘pips' and "pip value," returning to the essence of trading—price itself.

3-1: A Price-Based Formula Simplified to Perfection
The beauty of this formula lies in its universality and intuitiveness. You no longer need to concern yourself with the specific asset you're trading—whether it's EUR/USD, XAU/USD, US30, or BTC/USD.
Core Formula:
Lot Size = (Total Account Equity × Risk Percentage) / [(Entry Price - Stop Loss Price) × Contract Size]
Here, "Contract Size" is a relatively fixed value representing how many units of the asset one lot equals. For most forex pairs, it's 100,000. For gold, it might be 100 (ounces). You only need to understand this value once—or better yet, let a good calculator handle it for you. Why does this formula work? Because it directly captures the essence of risk. (Entry Price - Stop Loss Price) directly calculates how much price fluctuation risk you're willing to bear per unit of asset. Multiplying this by the Contract Size gives you the total dollar exposure if you trade 1 lot. Finally, dividing your planned total risk amount by this figure naturally yields the number of lots you should trade. The entire process is clear, direct, and leaves no room for ambiguity.
3-2: Practical Exercise 1: Calculating EUR/USD Position Size
Let's experience its power through a concrete example.
Account Balance: $5,000
Risk Percentage: 2%
Trading Pair: EUR/USD
Planned Entry Price (Long): 1.07500
Planned Stop-Loss Price: 1.07000
Contract Value: 100,000
Calculation Steps:
1. Risk Amount: $5,000 × 2% = $100
2. Risk per Lot: (1.07500 - 1.07000) × 100,000 = $500
(This means trading 1 standard lot would result in a $500 loss if the price drops from 1.07500 to 1.07000)
3. Final Lot Size: $100 / $500 = 0.2 lots
See? Three steps, clear logic—no need to think about EUR/USD's pip value at all.
3-3: Practical Exercise 2: Calculating Gold (XAU/USD) Position
Now, let's tackle gold, often confusing for beginners.
Account Balance: $5,000
Risk Ratio: 2%
Trading Instrument: XAU/USD
Planned Entry Price (Long): $2350.00
Planned Stop-Loss Price: $2340.00
Contract Value: 100 (oz/lot)
Calculation Steps:
1. Risk Amount: $5,000 × 2% = $100
2. Exposure per Lot: ($2,350.00 - $2,340.00) × 100 = $1,000
(This means trading 1 lot of gold exposes you to a $1,000 loss if the price drops from 2350 to 2340)
3. Final Lot Size: $100 / $1000 = 0.1 lot
Just as simple! You don't need to memorize the rule that each $1 gold price movement equals a $100 gain/loss per lot. The formula handles everything automatically. This is the beauty of the "Direct Method"—a truly unified risk management framework applicable to all markets.
4: Your Ultimate Weapon: The Free Position Sizing Calculator
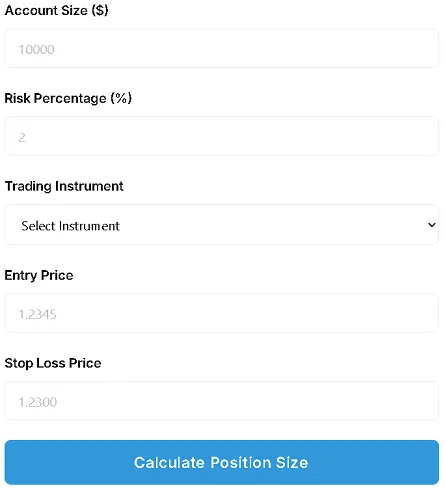
Alright, friend, you now possess a more advanced and simpler mental model than 90% of traders. But I know that even this simplified formula can be a hassle to calculate manually during split-second trading decisions—not to mention the risk of miscalculating. So, to free you from all calculation headaches, we've developed this completely free Position Sizing Calculator, built with the core logic of the "Direct Method" embedded inside. Its sole mission: to let you safely and accurately complete your final pre-trade preparation within 10 seconds.

Let's see how this little tool works. You only need to fill in a few straightforward parameters:
Account Size ($): Your trading account's total balance.
Risk Percentage (%): The risk you're willing to take on this trade. Beginners are strongly advised to start at 1%.
Trading Instrument: The asset you plan to trade, e.g., EUR/USD, XAU/USD. We've pre-set contract values for common instruments—no need to adjust.
Entry Price: The price at which you plan to place your order.
Stop Loss Price: Your planned stop-loss level.
Once you've filled these in, simply tap "Calculate." The calculator will instantly provide three core results:
Risk Amount: The maximum loss (in USD) you plan to risk on this trade.
Position Size in Lots: The lot size you should enter in your trading platform.
Position Size in Units: The number of trading units corresponding to the lot size.
This entire process is as simple as entering a start and end point in navigation software. You provide the raw, authentic data, and the tool handles all the complex intermediate steps, delivering you the final, actionable answer directly.
Try My Free Position Sizing Calculator Now! - 100% Free!
5: Beyond Calculation: Where Should Your Stop Loss Be Placed? (Professional Trader's Secret)
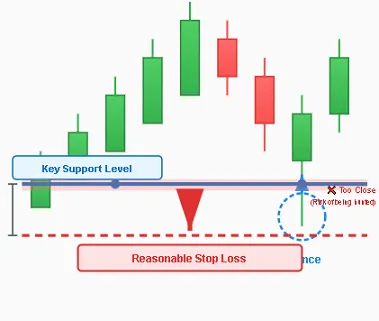
So far, we've focused on "how to calculate," but a more fundamental question is often overlooked: Where exactly should you set that "stop loss price" that forms the basis of your calculations? This is an art that determines the success or failure of your trades. A careless stop loss can get wiped out by normal market "noise," no matter how precise your position sizing is. A scientifically placed stop, however, provides real protection. Here, I share three strategies most commonly used by professional traders that can significantly improve the rationality of your stop placement.
5-1: Strategy One: Utilizing Key Support and Resistance Levels
This is the most classic and reliable method. Support levels are areas where prices may find backing and rebound during declines, while resistance levels are zones where prices may encounter pressure and pull back during advances. A reasonable stop loss should be placed "outside" these critical price points, allowing sufficient "breathing room" for price movement. When going long, identify the key support level below and place your stop loss a certain distance below that support. When going short, identify the key resistance level above and place your stop loss a certain distance above that resistance. This "certain distance" prevents "false breakouts." Markets often briefly pierce a key level to "hunt stop losses" before reversing back to the original direction.

5-2: Strategy Two: Based on Market Swing Highs/Lows
Markets do not move in straight lines; they advance in waves, forming a series of swing highs and swing lows. These peaks and troughs directly reflect market sentiment and serve as natural barriers for setting stop-losses. When going long in an uptrend, identify the previous significant swing low(s) and place your stop-loss below it. As long as the uptrend persists, prices should not break below prior lows. When shorting in a downtrend, locate the previous significant swing high(s) and place your stop-loss above it. The advantage of this approach is that it aligns with the market's inherent structure rather than arbitrarily guessing a price level.
5-3: Strategy Three (Advanced): Dynamically Adjust Using the ATR Indicator
ATR (Average True Range) is a technical indicator measuring market volatility. It reveals the average daily (or per-period) price range over a specific timeframe. This powerful tool enables "intelligent" stop-loss placement. Calculate the current ATR value (e.g., ATR(14) on a daily chart equals 80 pips). When going long, set your stop loss distance by subtracting 1.5 or 2 times the ATR value from your entry price; for short positions, do the opposite. Its advantage lies in automatically widening your stop loss distance during high volatility, preventing premature "knockouts" from the market. Conversely, during calm markets, the ATR value shrinks, allowing tighter stops to capture gains with reduced risk.
| Stop-Loss Strategy | Advantages | Disadvantages |
|---|---|---|
| Support/Resistance Levels | Based on widely recognized key price levels; clear logic. | May become target zones for "stop-hunting". |
| Swing Highs/Lows | Aligns with market structure and trends; good dynamism. | May underperform in range-bound markets. |
| ATR Indicator | Scientifically quantifies volatility; adapts to various market conditions. | Requires understanding of the indicator; parameter settings involve subjectivity. |
6: Hidden Killers: Slippage and Spreads You Must Consider
Friend, even if you've mastered position sizing and stop-loss placement perfectly, there's a "devil" lurking in the background of your trades that you must recognize. Otherwise, it could deliver a fatal blow when you least expect it. These two devils are slippage and spreads. The spread is the difference between the Ask (buy) price and the Bid (sell) price you see when opening any trading platform. Remember: When going long, your trade executes at the higher Ask price; when setting a stop-loss, it triggers at the lower Bid price. This means your stop-loss could be "prematurely" triggered. Slippage, meanwhile, is the difference between your final execution price and your pre-set price. It typically occurs during periods of extreme market volatility or sudden liquidity shortages (e.g., during major economic data releases). Imagine you set a stop-loss at 1.0700, but the market gaps down from 1.0701 to 1.0680 due to bad news. Your stop order likely won't execute at 1.0700 but at the next available price—perhaps 1.0695 or even lower. This means your actual loss could exceed your planned amount. While we can't eliminate slippage, we can proactively manage its impact: 1. Build in a buffer: Add a deliberate margin of safety to your calculated stop-loss level. 2. Avoid high-risk periods: Refrain from opening or holding positions within minutes of major news releases. 3. Choose a reputable broker: A good broker typically offers tighter spreads and superior order execution, reducing the likelihood of slippage.
7: Build Your Professional Trading Workflow
By now, you've grasped the core principles of position management. But a professional trader's decisions aren't isolated—they're part of a process. Our website provides a complete suite of free tools to help you build this professional "pre-trade checklist workflow," much like a pilot's pre-flight checklist.

Step 1: Evaluate the trade's "value" - 【Risk-Reward Calculator】 Before calculating your position size after deciding entry and stop-loss points, use our Risk-Reward Calculator to assess whether the trade is "worth it." Professional traders typically only consider opportunities where the reward is at least twice the risk (R: R > 1:2).
Step 2: Precisely Calculate Your "Ammo" - [Position Sizing Calculator] Only after a trade meets the value-for-money criteria do we proceed to this step. Use the Position Sizing Calculator we'll discuss in detail today to precisely calculate the number of lots you should use.
Step 3: Ensure Your "Logistics" Are Secure - [Margin Calculator] After determining your lot size, the final step is verifying your account has sufficient margin. Input your planned lot size into our margin calculator, and it will show how much margin this trade will consume. This prevents margin calls from overleveraged positions.
Through this simple three-step process, every trading decision you make will be grounded in rationality, data, and thorough planning—not impulsive urges.
8: Important Tips for Using Our Calculators
To help you use these tools effectively and foster mutual trust, I must honestly share some considerations:
1. It's a planning tool, not an execution tool: Our calculators assist you in perfecting your plan before trading. Final order placement requires manual execution on your trading platform (e.g., MT4, MT5).
2. Results are theoretical: The risk amounts provided are theoretical. As discussed earlier, factors like slippage, spreads, and potential broker commissions/overnight interest (Swap) may cause slight discrepancies between calculated and actual losses.
3. Regarding Contract Specifications: Our calculator defaults to industry-standard contract sizes (e.g., 1 lot = 100,000 units for forex). If your broker offers mini or micro lot accounts, ensure you understand the conversion ratios between them.
9: My Personal Perspective and Insights
Having shared all this, I'd like to conclude with some heartfelt thoughts. In my view, truly mastering position sizing management was the watershed moment that transformed me from a consistently losing novice into a trader capable of stable survival in the markets. Before that, my trading was chaotic and emotionally driven. I'd become extremely greedy after a big win, placing heavy bets on the next trade, or I'd be gripped by fear after an unexpected loss, hesitating timidly when the next opportunity arose. My account equity curve resembled a thriller movie's electrocardiogram—wildly volatile. But when I truly began enforcing the "2% rule" and using tools to precisely calculate each position, everything changed. The most significant shift wasn't a sudden increase in my win rate, but my mindset. I gained an unprecedented sense of **control**. I knew that no matter the outcome of a trade, the damage to my account would be manageable and negligible. Losses ceased to be a demon to fear and instead became a predictable cost inherent to running this "trading business." This mental liberation finally allowed me to channel all my energy into more valuable pursuits: refining my trading strategies and analyzing market structures. For the first time, trading no longer kept me awake at night. So if I could offer you one piece of advice as a newcomer, it would be this: Before learning how to make money, learn how to control losses. Position sizing is your most powerful weapon for loss control.
10: Summary and Actionable Recommendations
Alright, friends, our deep dive journey is nearing its end. Let's quickly recap the valuable insights you've gained today:
1. Mindset Shift: You now understand that trading's core isn't prediction, but risk management—and position sizing is risk management's cornerstone.
2. Methodology Upgrade: You've mastered the revolutionary "Direct Method," freeing yourself from convoluted pip value calculations.
3. Tool Empowerment: You possess a free, powerful calculator toolkit to systematize and automate scientific risk management.
4. Skill Deepening: You've learned how to scientifically set stop-losses and counter the hidden threats of slippage and spreads.
Now it's time to turn knowledge into action. Here are three simple steps:
1. Bookmark This Page Immediately: Add this article and our Position Sizing Calculator page to your browser bookmarks. Treat it as your mandatory "checkpoint" before every future trade.
2. Conduct a Simulated Exercise: Open your demo account, select any trading instrument, and fully execute the "trading workflow" we covered today: assess risk-reward ratio -> calculate position size -> verify margin requirements. Hands-on practice will deepen your understanding exponentially.
3. Start with 1%: For live trading, I strongly recommend beginning with a conservative 1% risk allocation. Give yourself ample time and space to adapt to this professional trading rhythm.
11: Final Risk Warning
Allow me one last, most serious reminder: Financial markets are inherently uncertain. Past performance does not guarantee future results. No trading strategy or tool can ensure profits. Always maintain a sense of reverence and trade within your risk tolerance. Your capital safety is always the top priority.
12: Further Learning: Recommended Articles
To help build a more comprehensive knowledge base, I've selected the following articles from our website's library that are highly relevant to today's topic. I encourage you to continue reading:
13: Citations
Investopedia. "Position Sizing."
Investopedia. "What Is the 2% Rule in Trading?"


Leave a Comment: